Color types explained
In most style guides, colors are provided in CMYK (Cyan, Magenta, Yellow, Black), RGB (Red, Green, Blue), and HEX (Hexadecimal). Some style guides also include PMS (Pantone) colors.
Here’s a handy guide to each:
CMYK
- =Used for print
- =Tiny dots of cyan, magenta, yellow and black ink combine to make the color
PMS
- =Used for print, mainly spot or single-color printing
- =A proprietary ink system
RGB
- =Used for on-screen display
- =Combines red, green and blue colors
HEX
- =Used for on-screen display, mainly websites
- =A shorthand code for RGB color
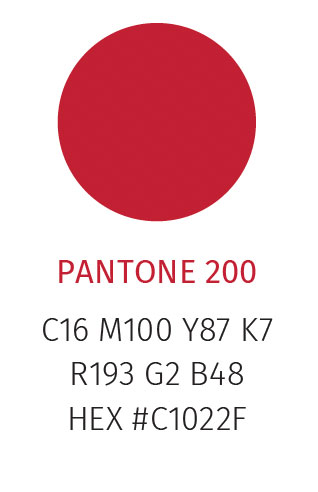
Now let’s take a look at how these color codes are shown in actual style guides. In this first screenshot, the color swatch is named by its Pantone. Then below are the formulas for CMYK, RGB, and HEX respectively.
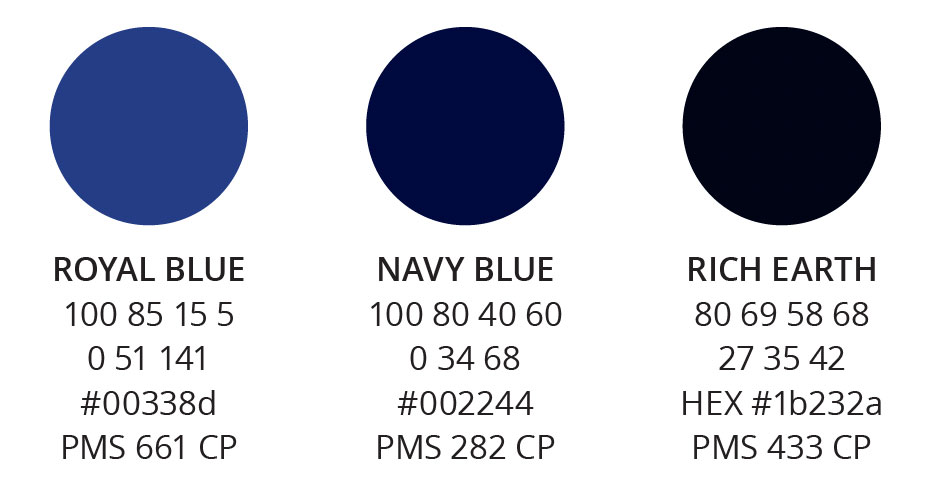
In these blue swatches, the colors are given names and the Pantone (PMS) is listed at the bottom.
Even though the CMYK and RGB color codes are not identified by their color initials in this example, you can still tell them apart because CMYK has four numbers and RGB has three. The numbers are always given in the same order.
I’m not going to go into too much depth on these codes because only designers need them, and any designer already knows how to use them. Just suffice it to say that if you’re working with a web or print designer, be sure that they have these color codes.
The color number that you do want to pay attention to is the HEX code, which is a combination of six numbers and letters, often preceded by a #. This is the number you will need when it comes to bringing these colors into document and presentation software, like Google Suite and Microsoft Office.
Using your brand colors
Now that we’ve identified which color code you should pay attention to (HEX), here’s how you bring those codes into your documents to use them.
Microsoft Powerpoint
I start with Powerpoint because if you load colors into Powerpoint in the right way, they will also be available in Word, which is a great time-saver. Here’s how you do it:

1
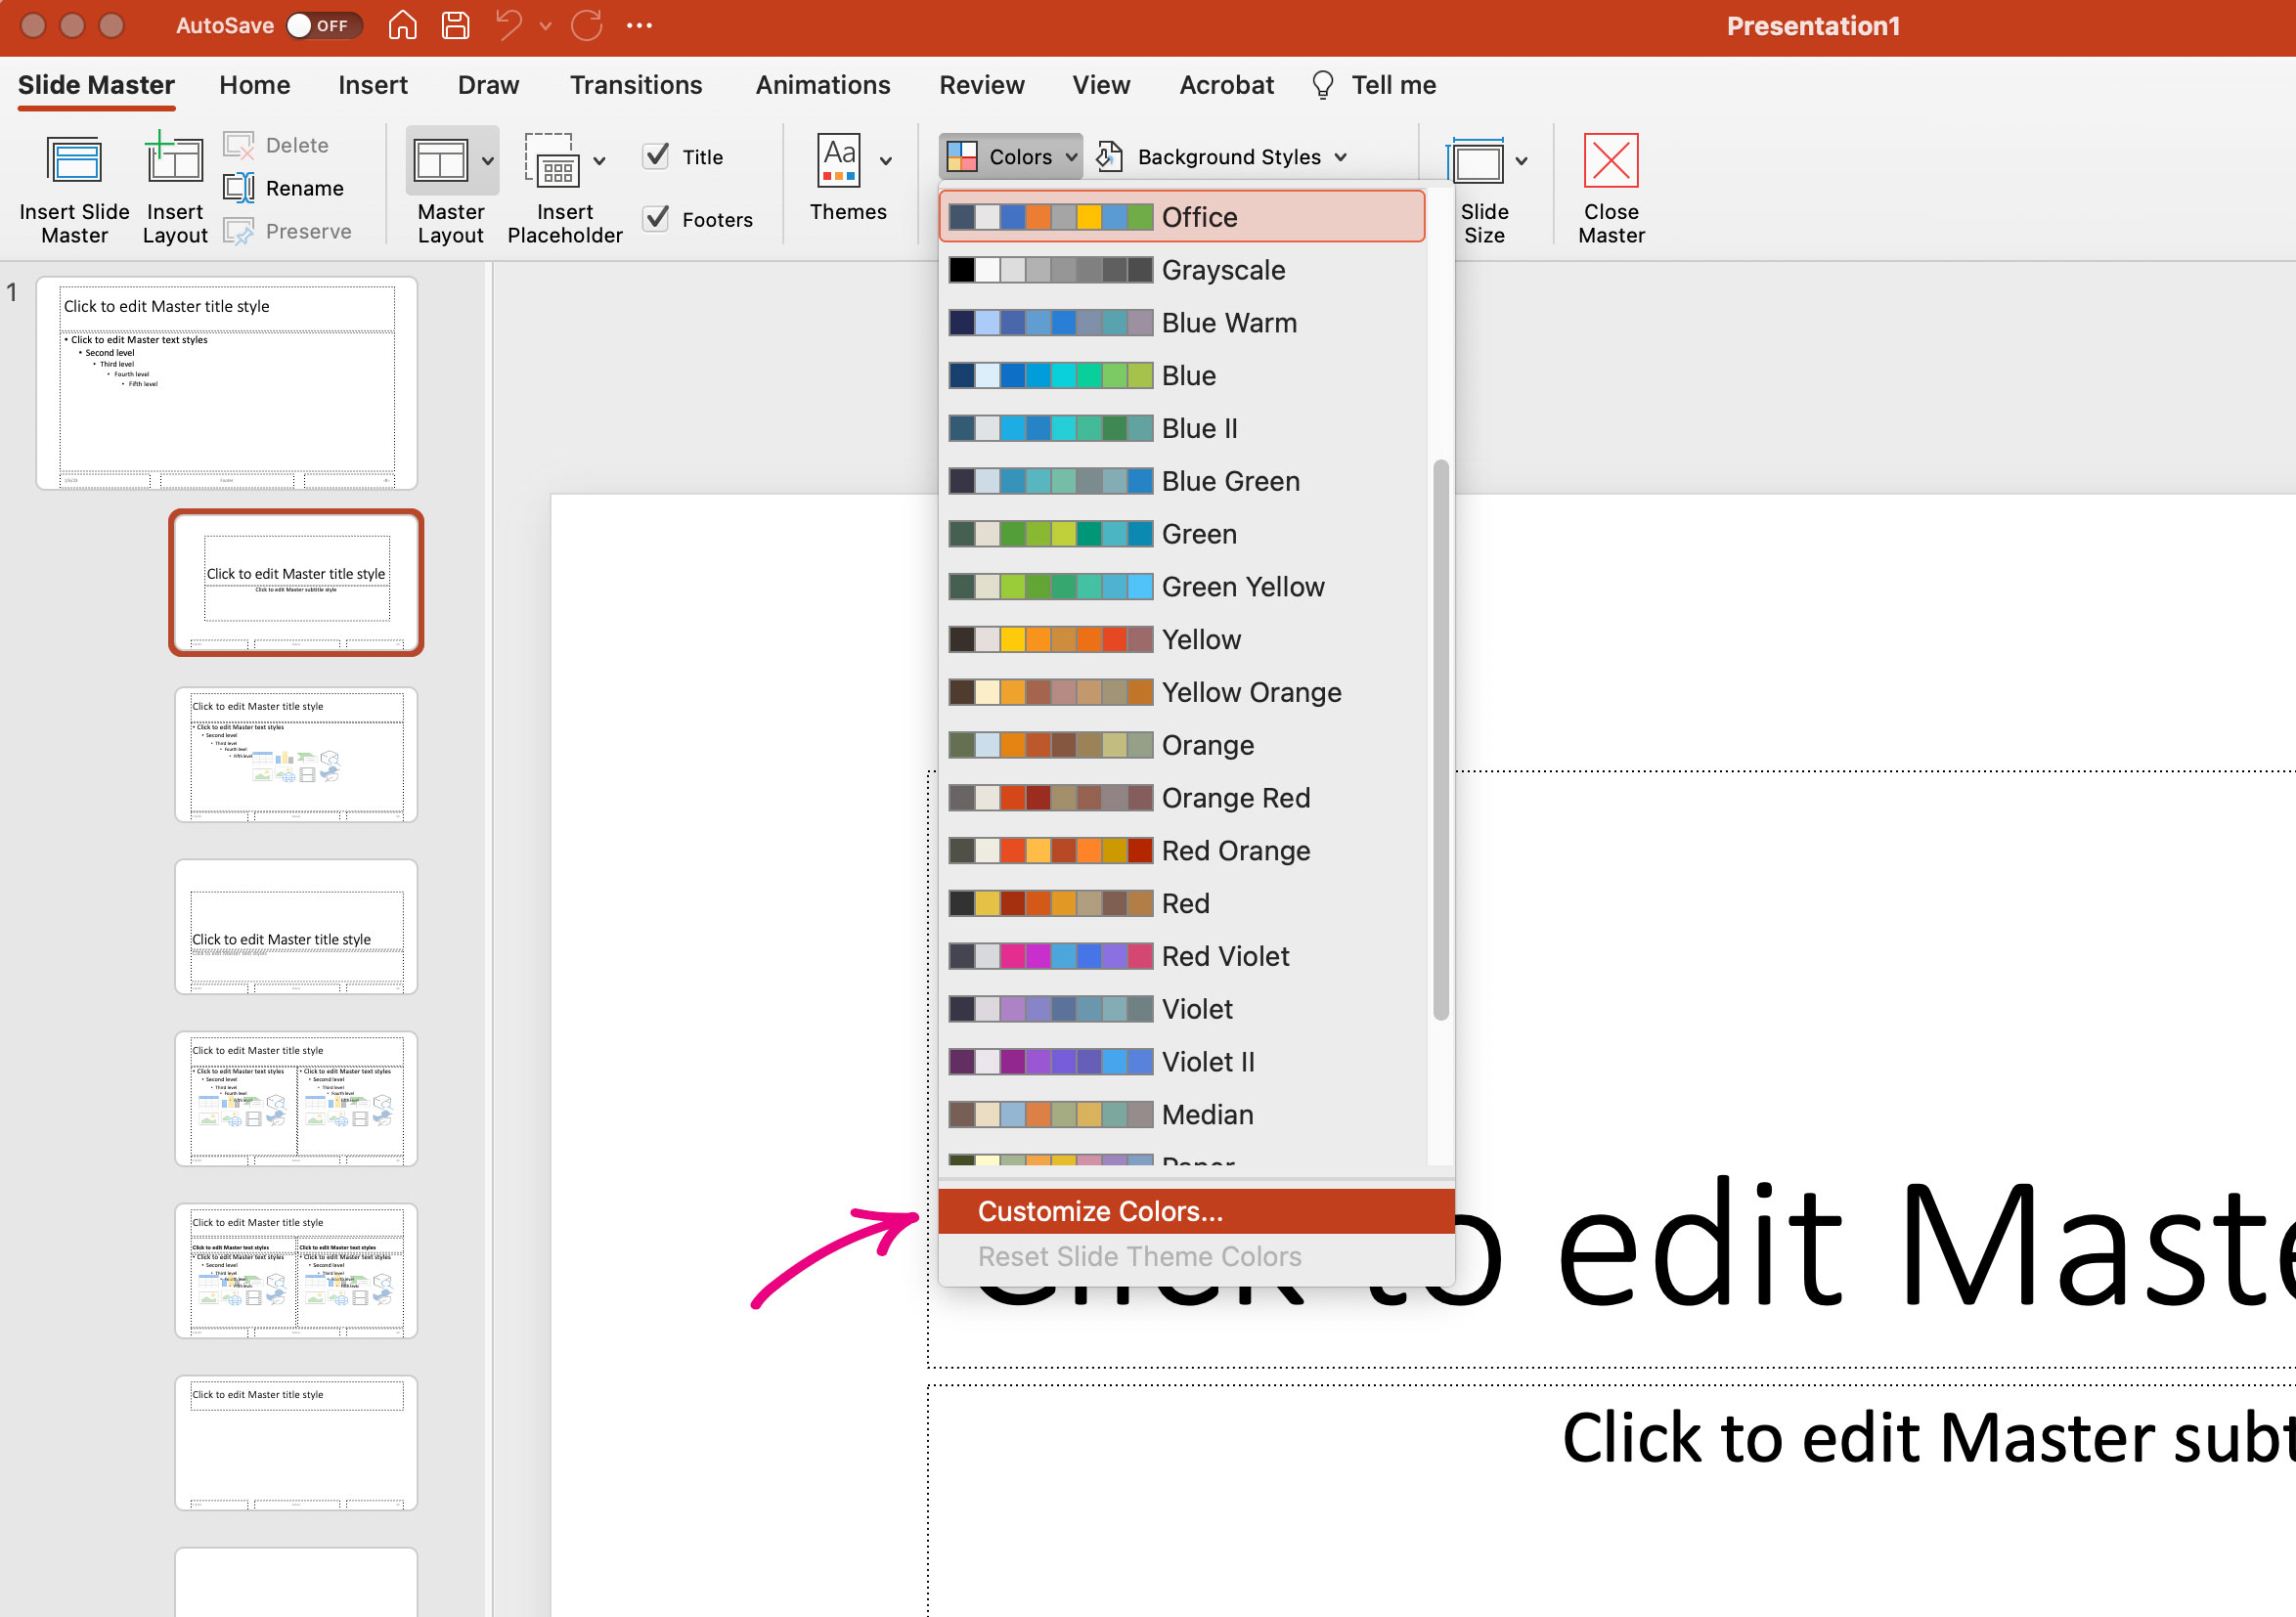
Create a new Powerpoint presentation. In the tools across the top, go to View and click “Slide Master”.
2
Click on the Colors drop-down and select “Customize Colors…”.
3
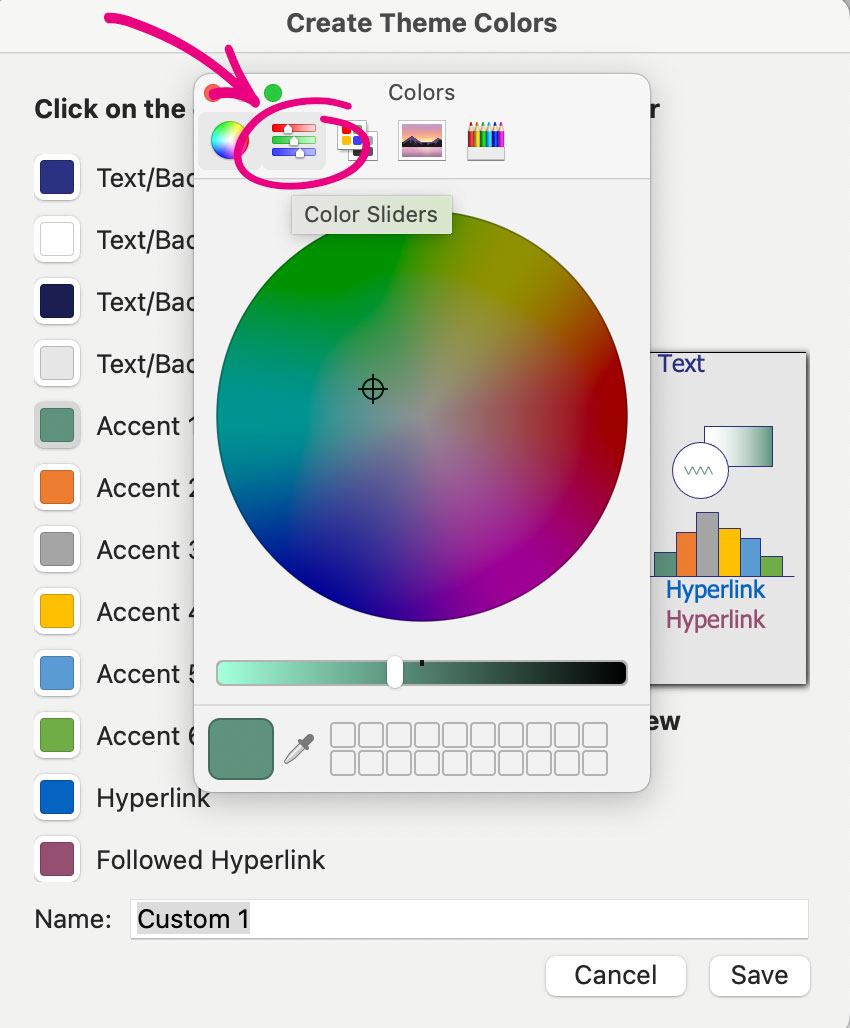
In the Create Theme Colors window, click on a color. In the window that pops up, select the second option at the top “Color Sliders”.
4
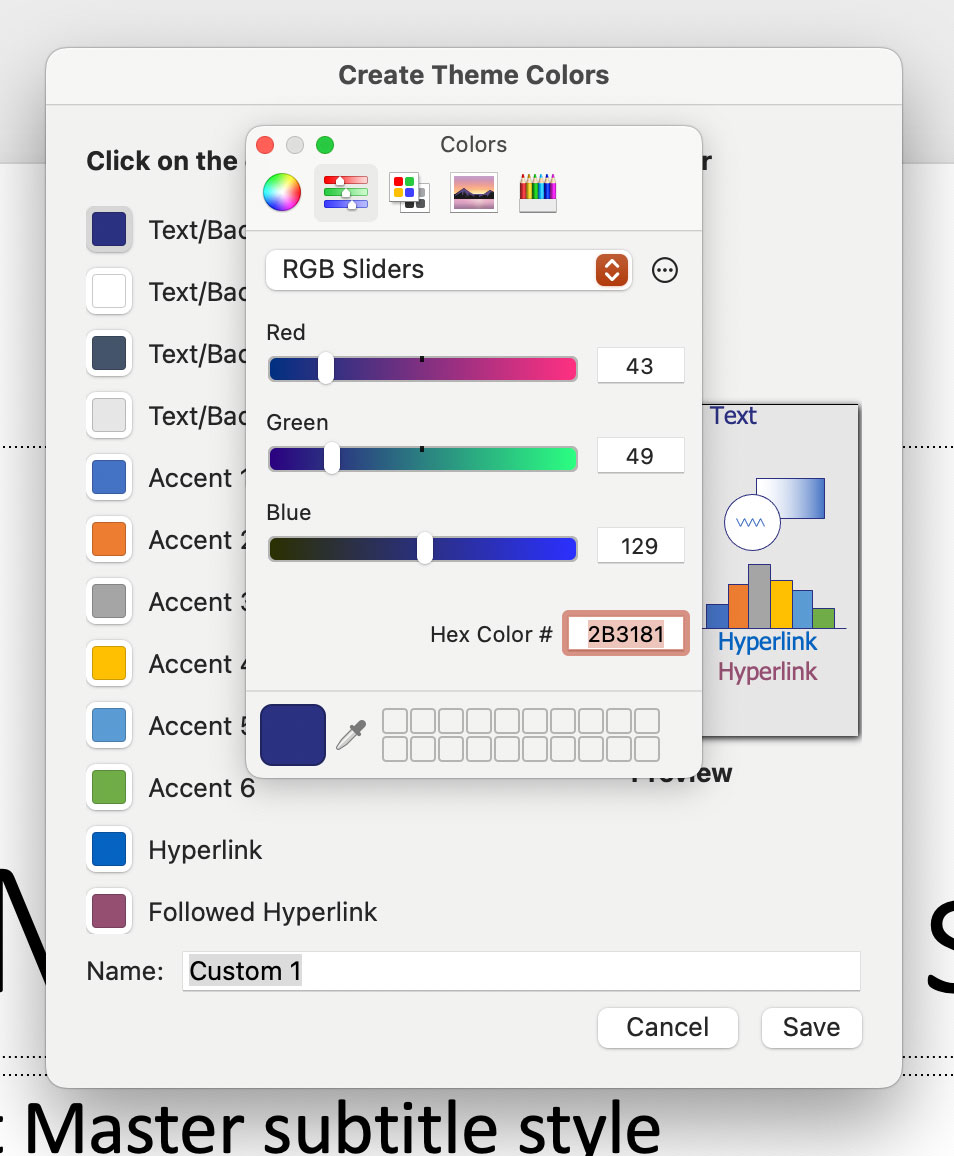
Now you can input the hex codes for your colors (or RGB if you wish). Just click each color and replace it with your own.
Important: Be sure to keep the relationship between the colors the same, so where it says “Dark Background” keep it dark, for example. If you ignore those labels, your Powerpoint presentation will be hard to work with. If you don’t have strong feelings on background colors, just modify the Accent colors.
5
When you’re done entering color codes, type the palette name and Save.
6
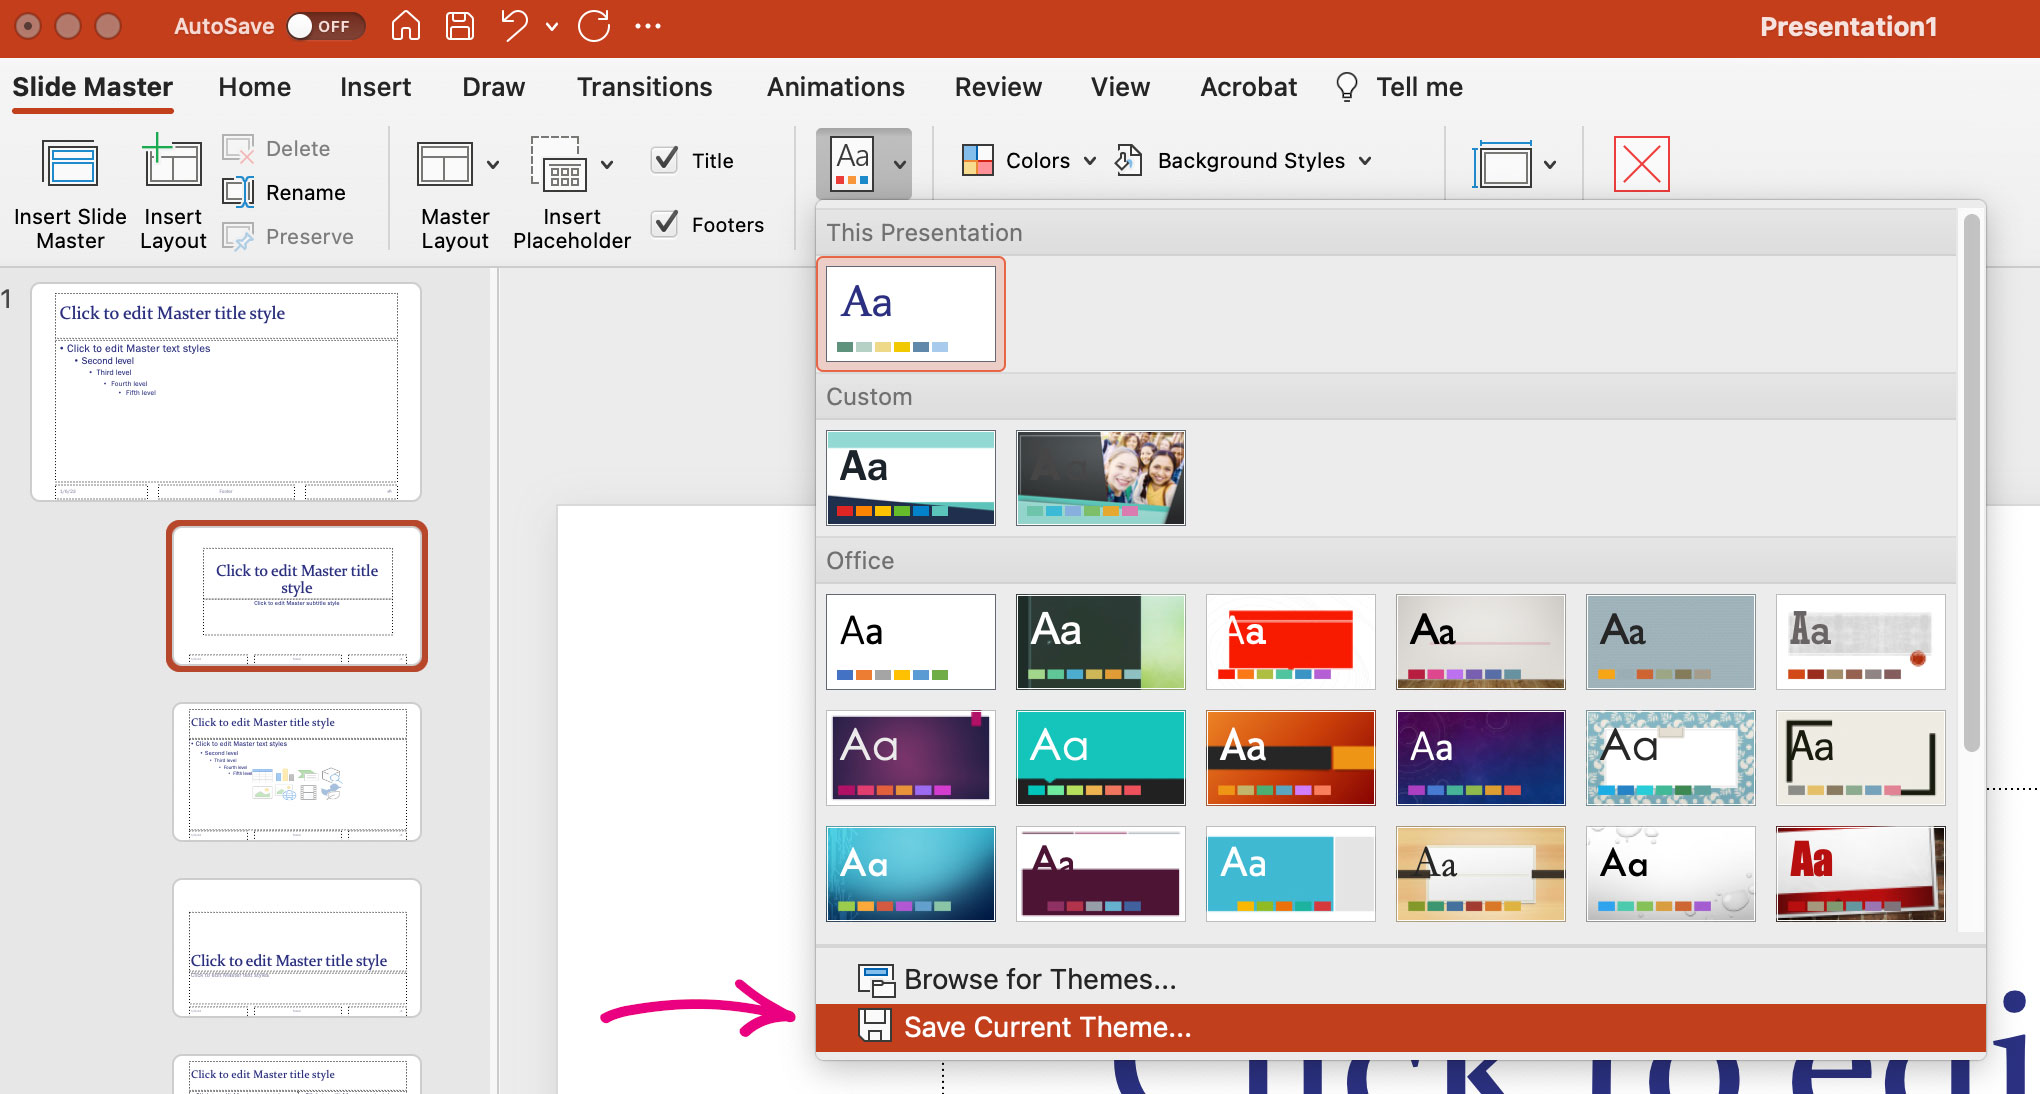
Next to the Colors drop down, select the Themes drop down and Save Current Theme. Name it what you wish and leave it in the folder location it has as the default for your themes.

7
That’s it! Now you can close the Master View.
Note: If you wish to add your brand fonts to the theme, do it before you save it in Step 6. Windows users can select custom fonts for a theme. Unfortunately, at this time Mac users cannot without a big work-around, so you’re stuck choosing from the Microsoft defaults.
Now your Powerpoint has your brand colors, what about your documents? If you did the above steps, the next part is easy!
Microsoft Word
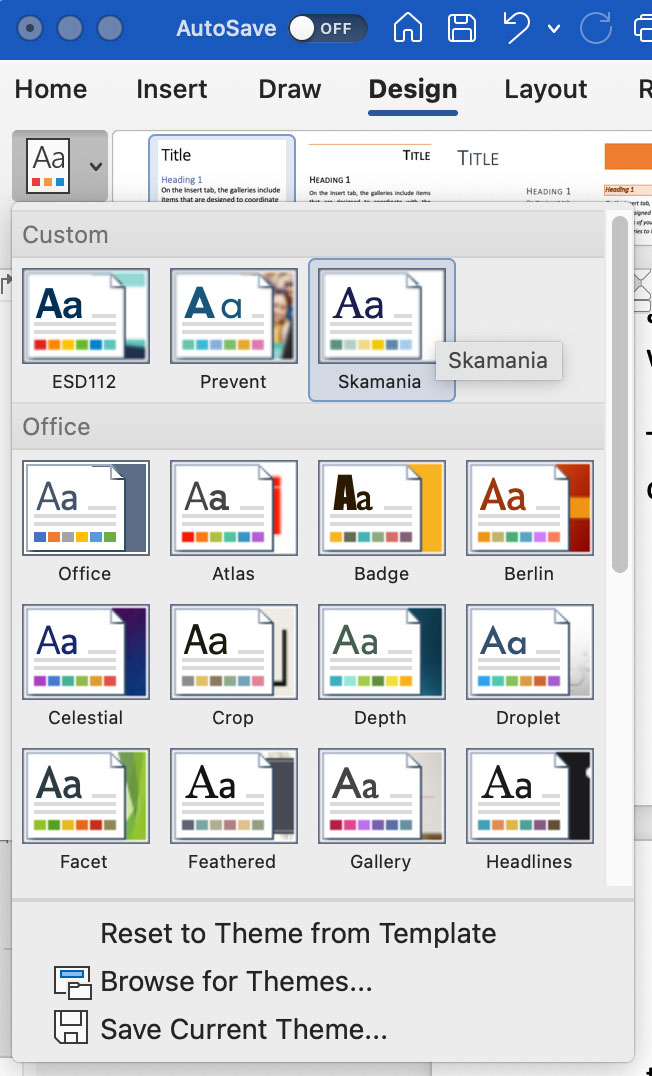
If you did the steps in Powerpoint to create a theme, all you have to do now is select it. In Microsoft Word, go to the Design tab at the top, these select the Themes drop down on the far left.
You’ll see your custom theme right at the top! By selecting it, it will update your color palettes and all your Styles.
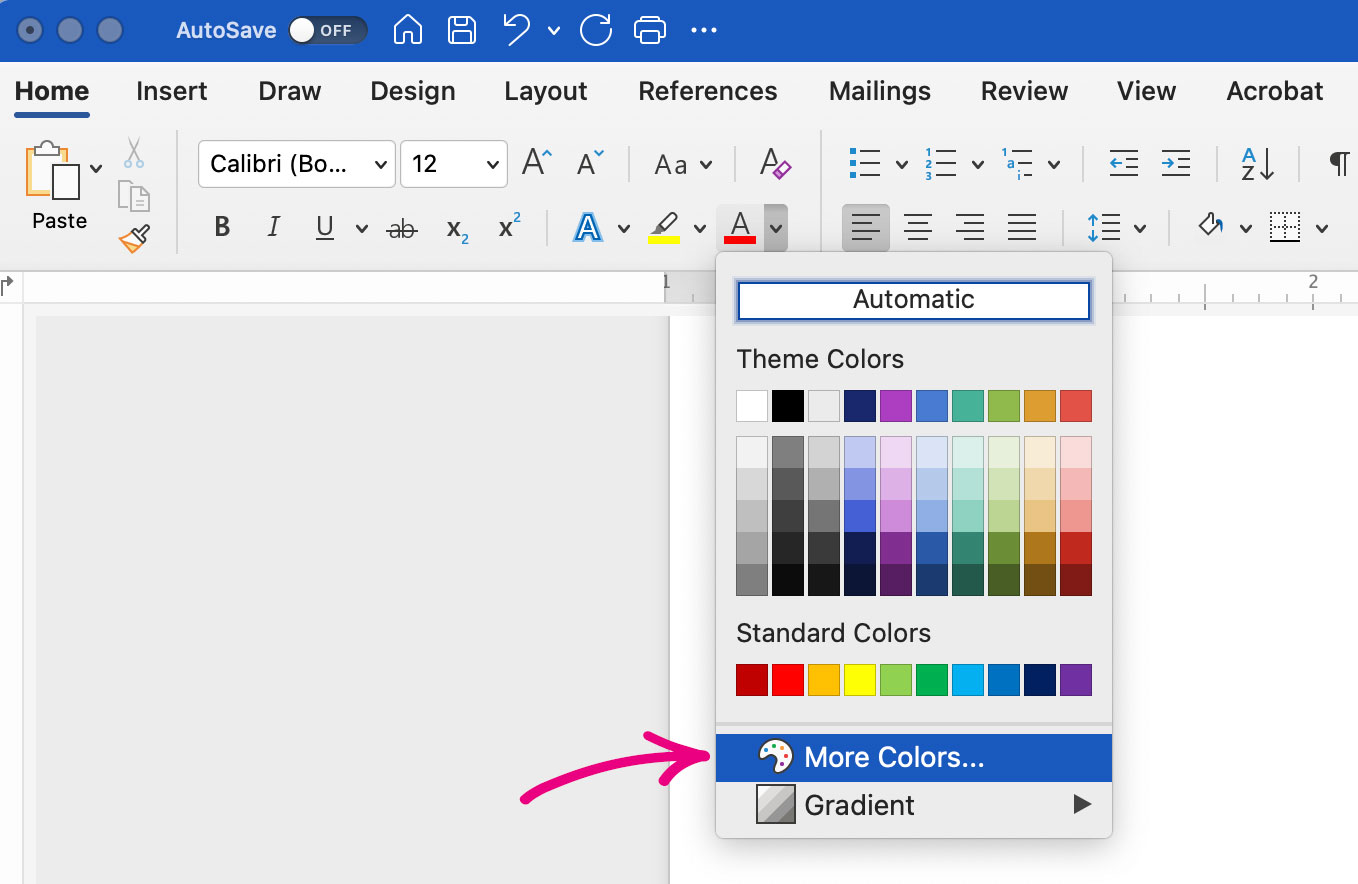
If you didn’t create a custom theme in Powerpoint, you’ll have to manually add colors where you want them. For example, in the text color drop down select “More Colors” and then go through the same process of putting in the hex codes as for Powerpoint above. BUT, you’ll have to do this for Every. Single. Document. Considering this is your brand that you’ll be working with every day, it’s better to just make the Custom Theme in Powerpoint first. Trust me on this.
When using Google suite for presentations or documents, the process is similar, although not as robust, in the case of Google Docs. Unfortunately, Google Docs does not have the ability to set a theme, like Microsoft Word does. Your only option is to add custom colors to the text color palette manually.
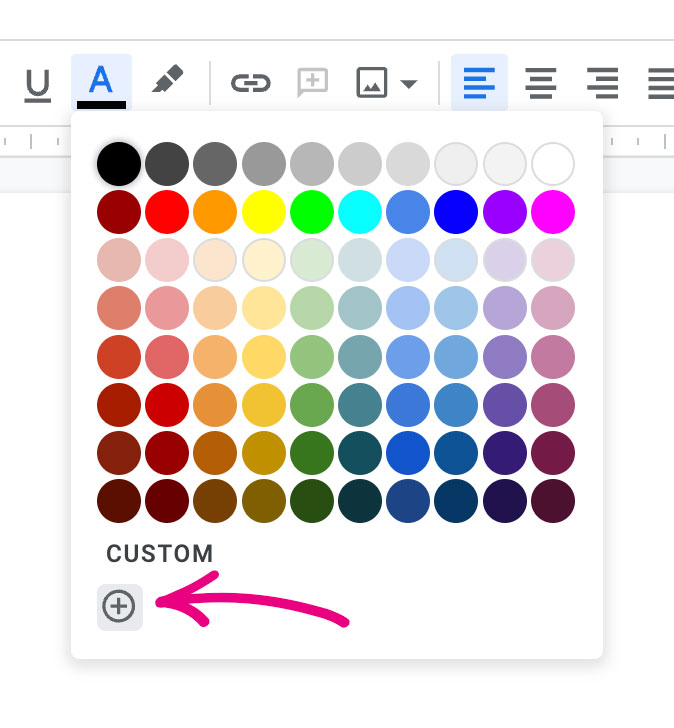
1
Click the Text Color, and click the plus symbol at the bottom under “custom.”
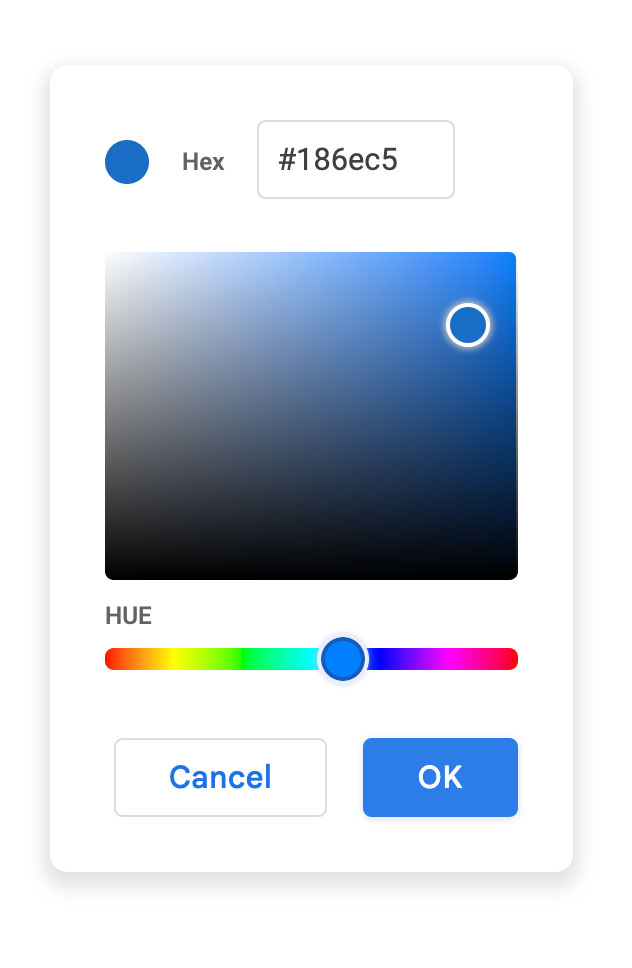
2
Type in your Hex code (Google does not give the option to input RGB numbers.
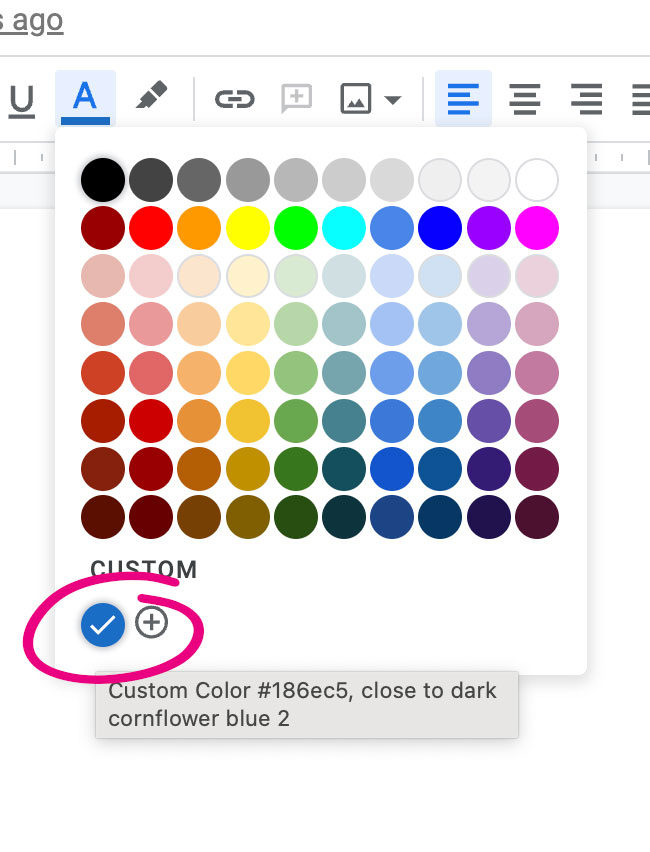
3
The colors you input will now show in the custom colors section with a suggestion of which Google color is closest.
With Google Slides, the process is very similar to Microsoft Powerpoint:
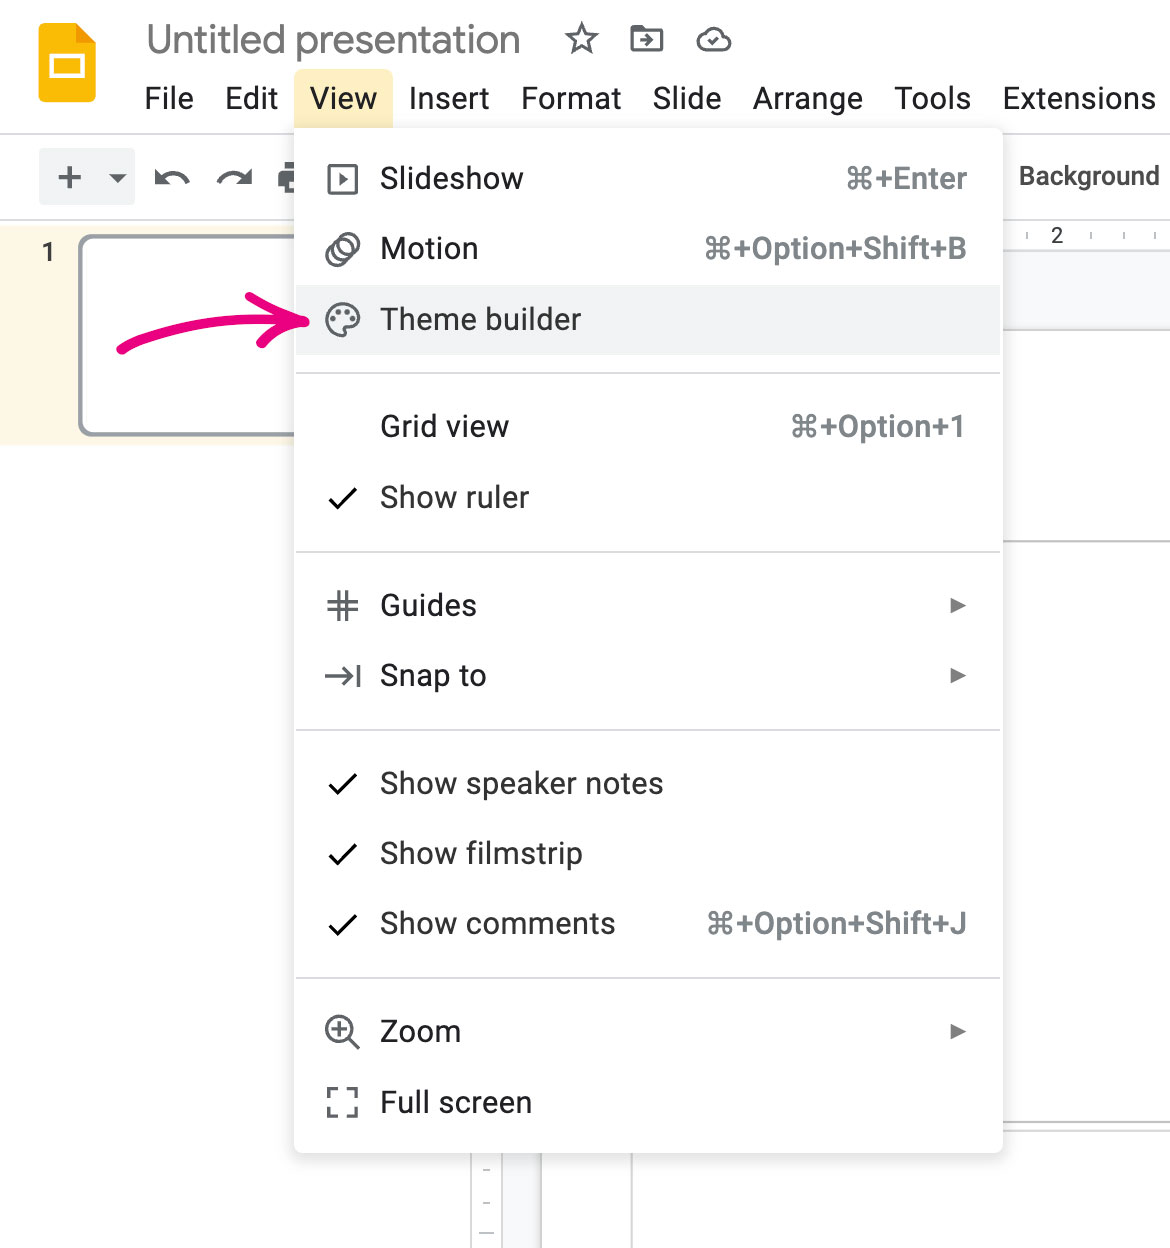
1
Create a new Slides presentation. In the tools across the top, go to View and click “Theme builder”.
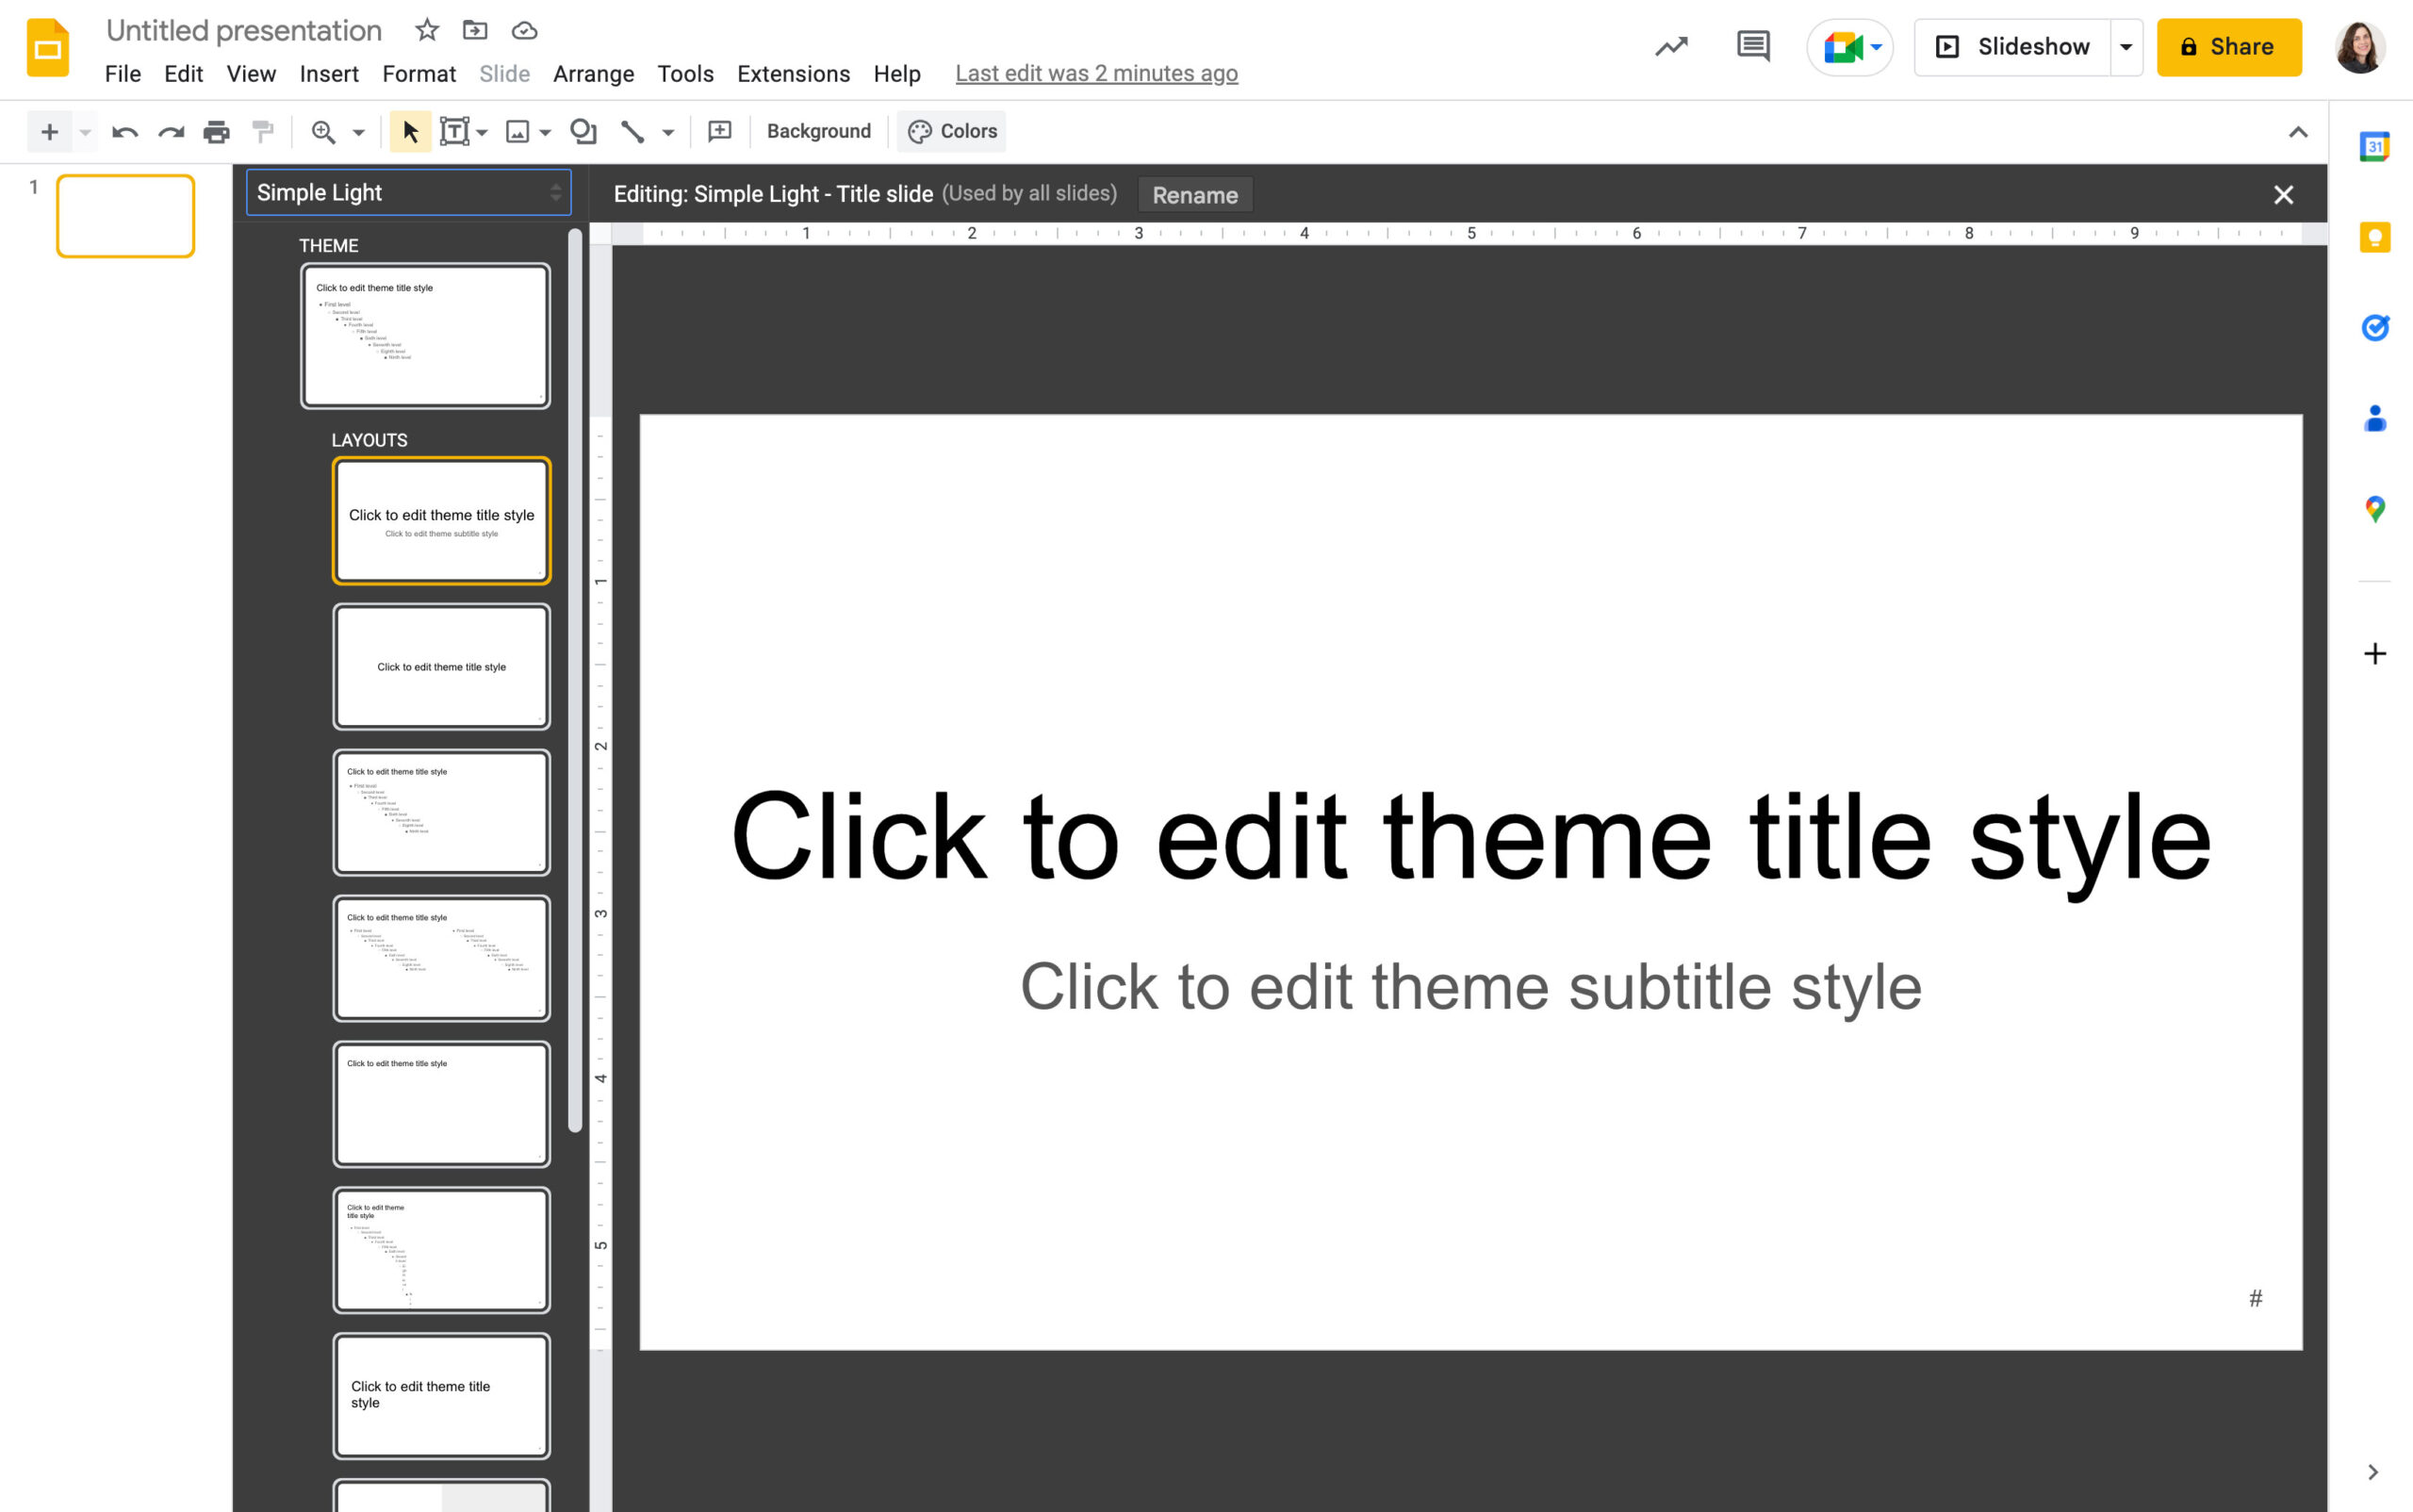
The background will go dark gray, and you’ll see all the slide templates.
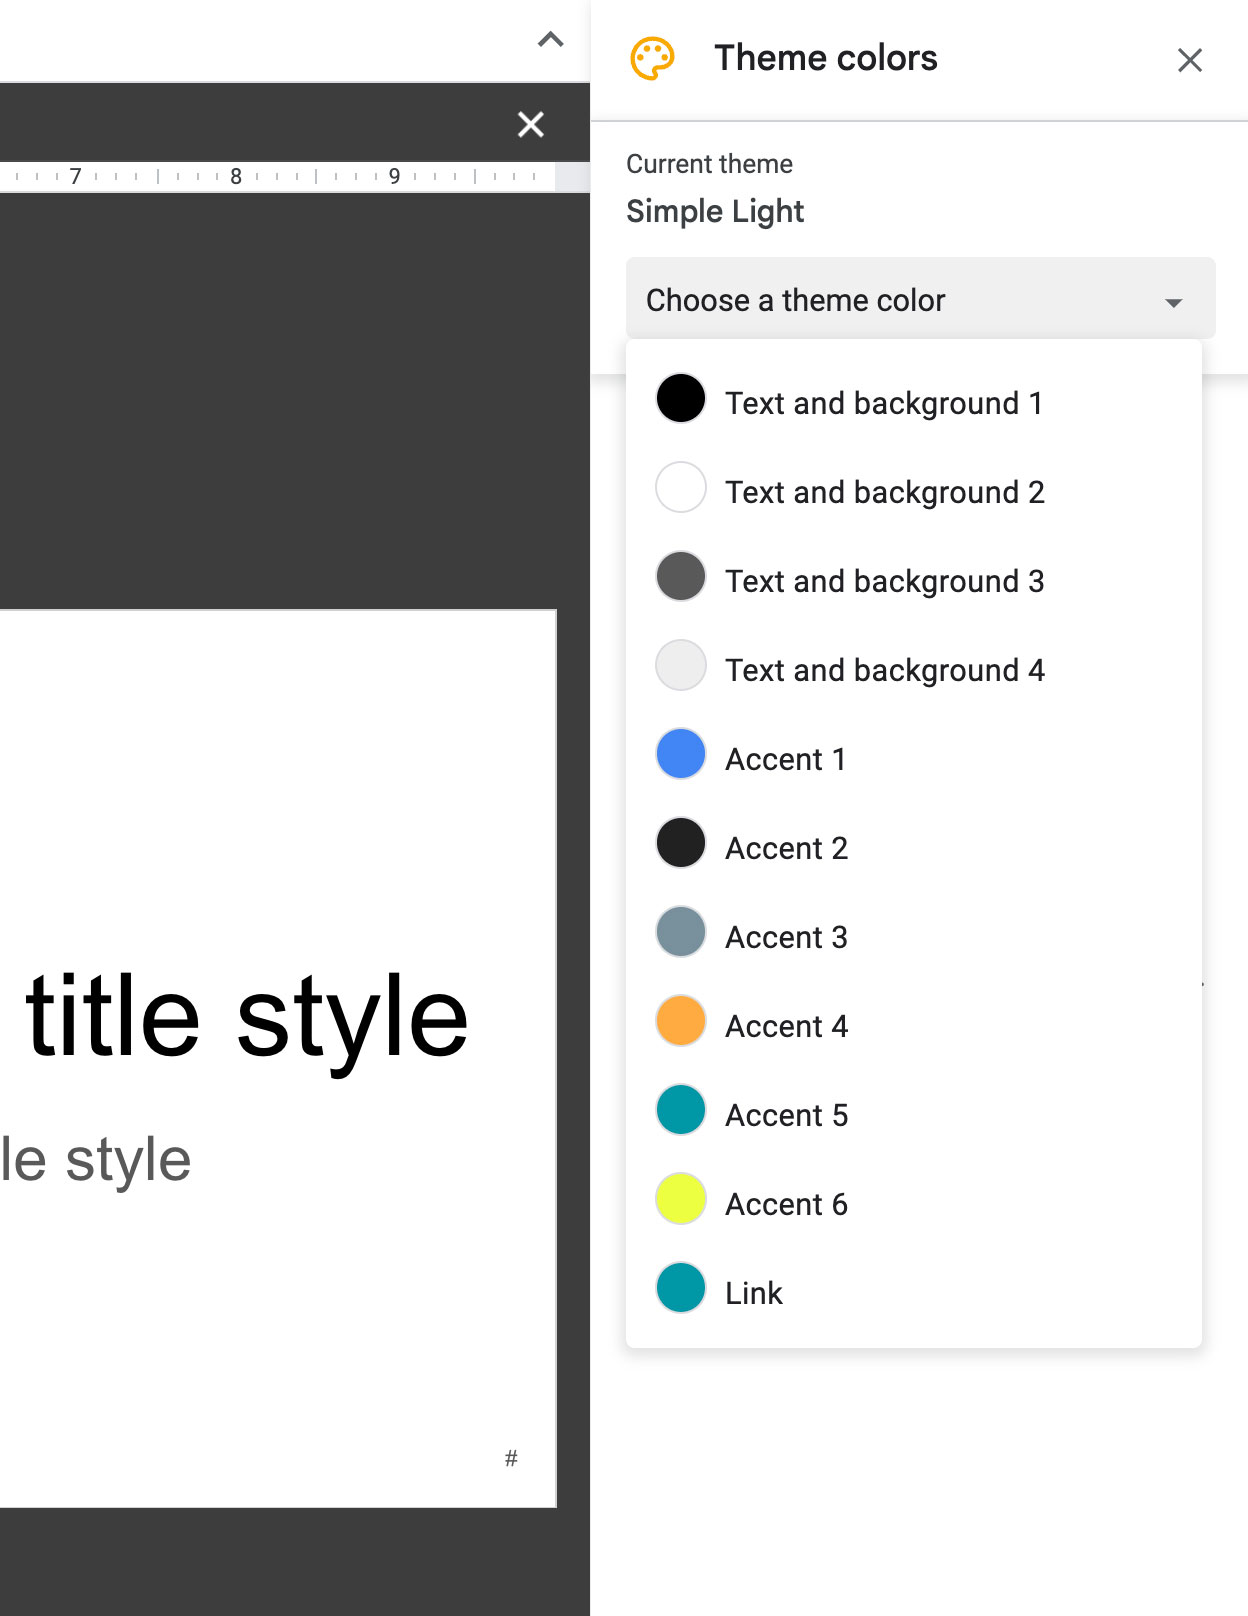
2
Click on the Colors button at the top, and a Theme Colors sidebar will appear on the right.
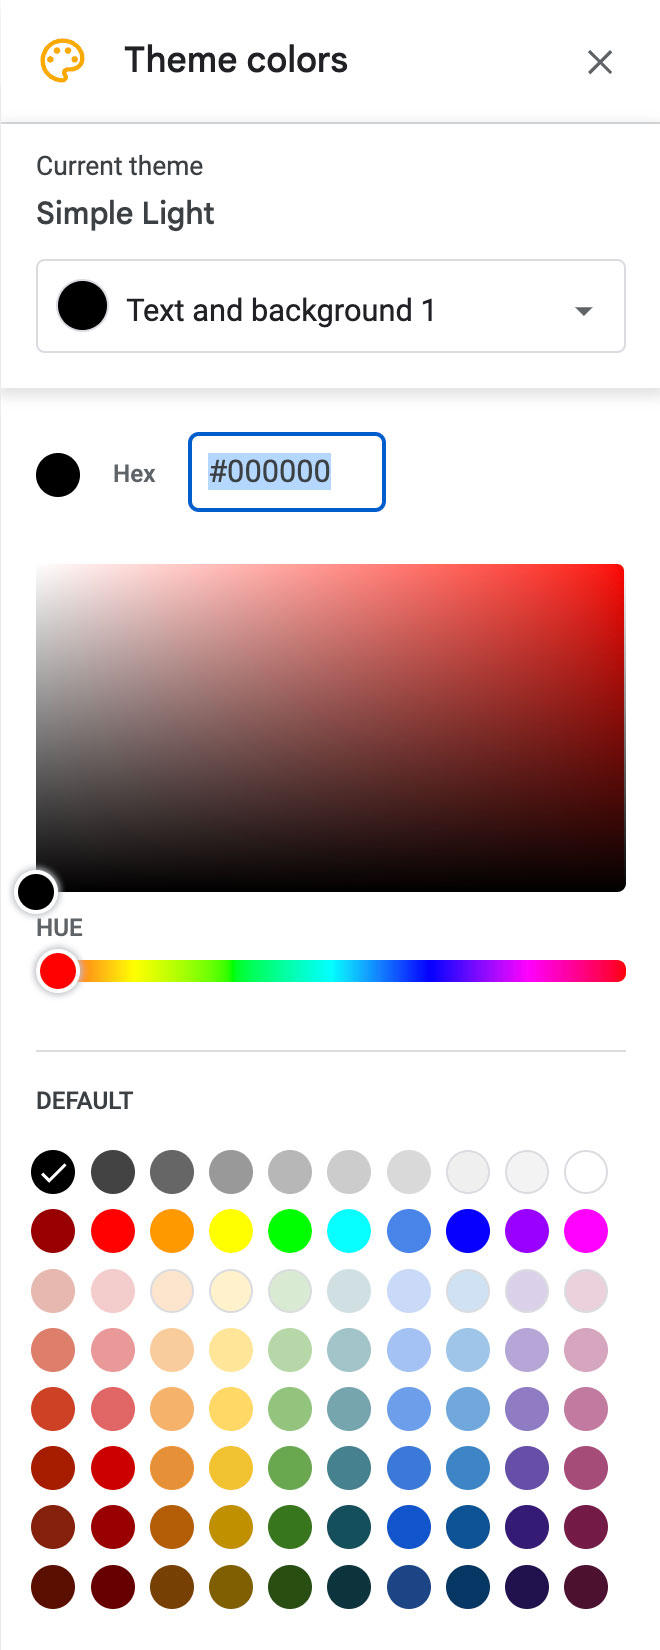
3
In the Theme Colors window, click on a color. Now you can input the hex codes for your colors. Just click each color and replace it with your own.
Important: Be sure to keep the relationship between the colors the same, so if a color is dark keep it dark, for example. If you ignore those labels, your presentation will be hard to work with. If you don’t have strong feelings on background colors, just modify the Accent colors.

4
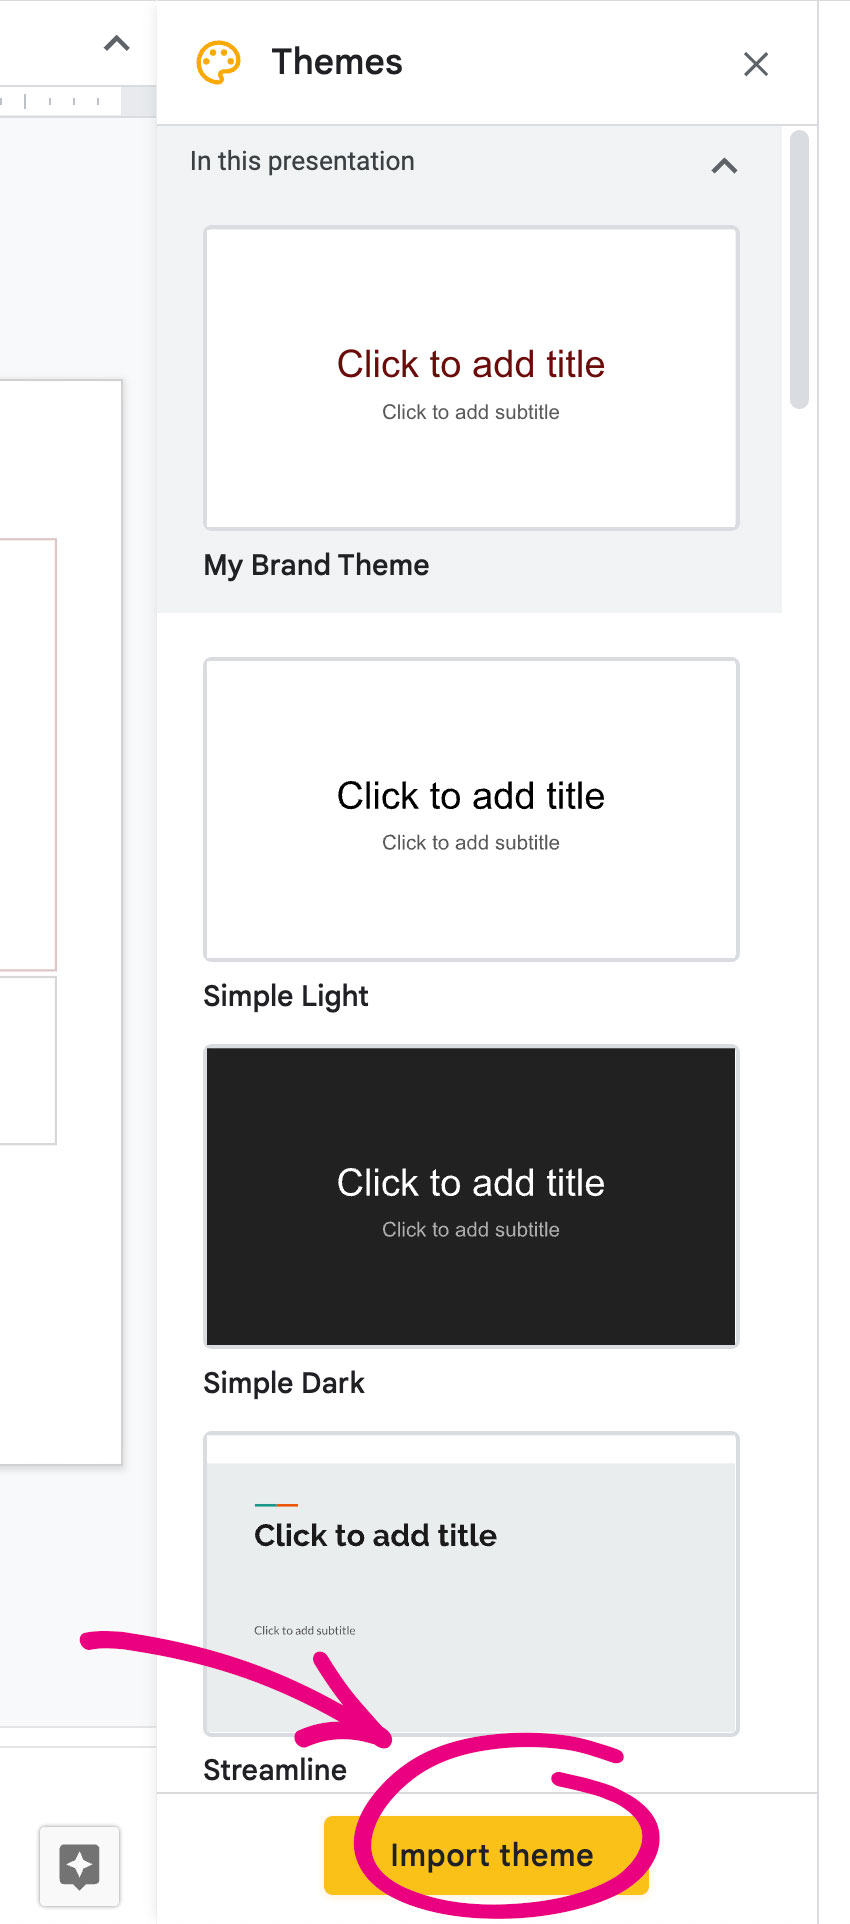
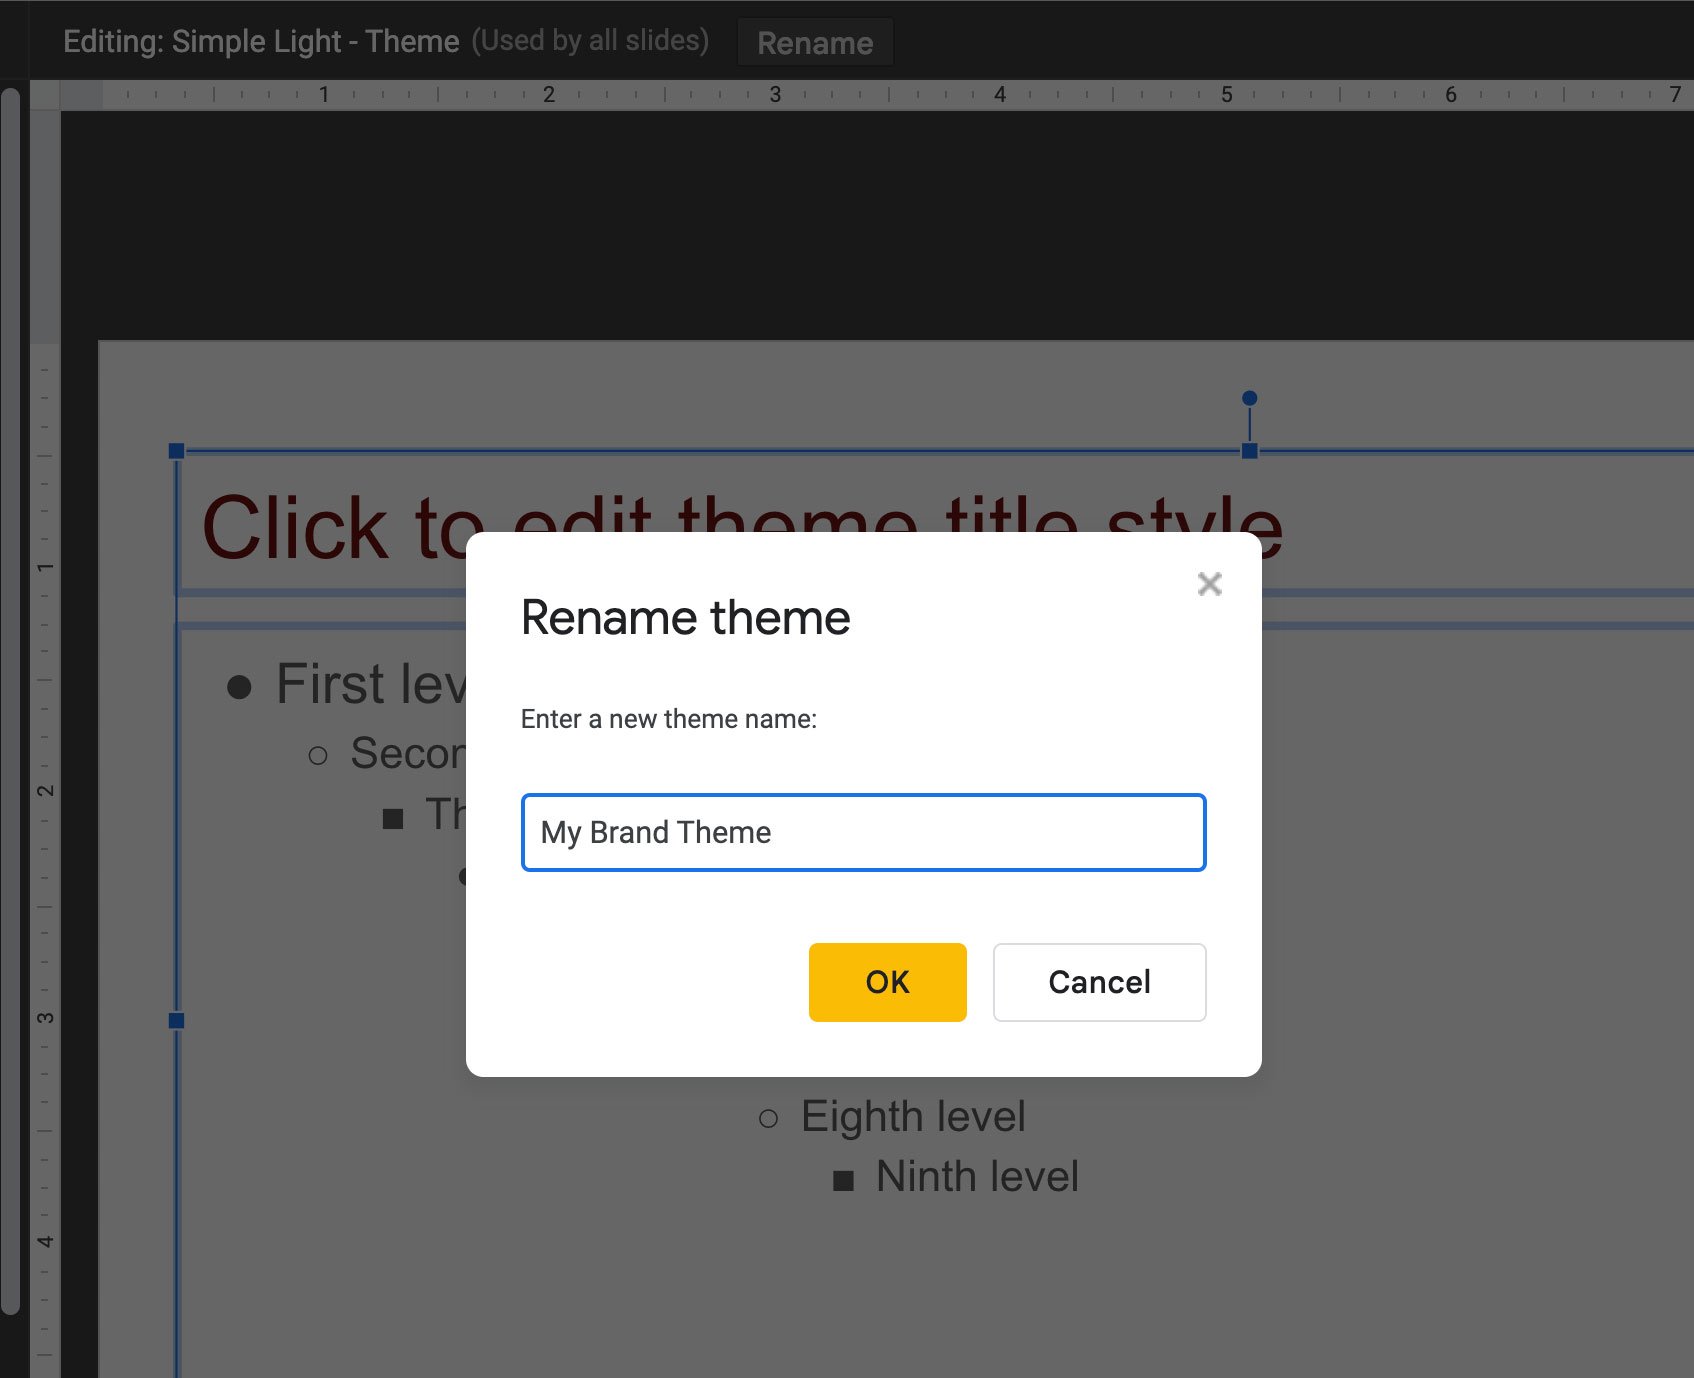
When you’re done entering color codes be sure to name your Slides theme to make it easy to find. At the top, click “Rename” and name it what you wish.
5
After making any other customizations to your slides template, close the Theme Builder View using the X in the upper right.
6
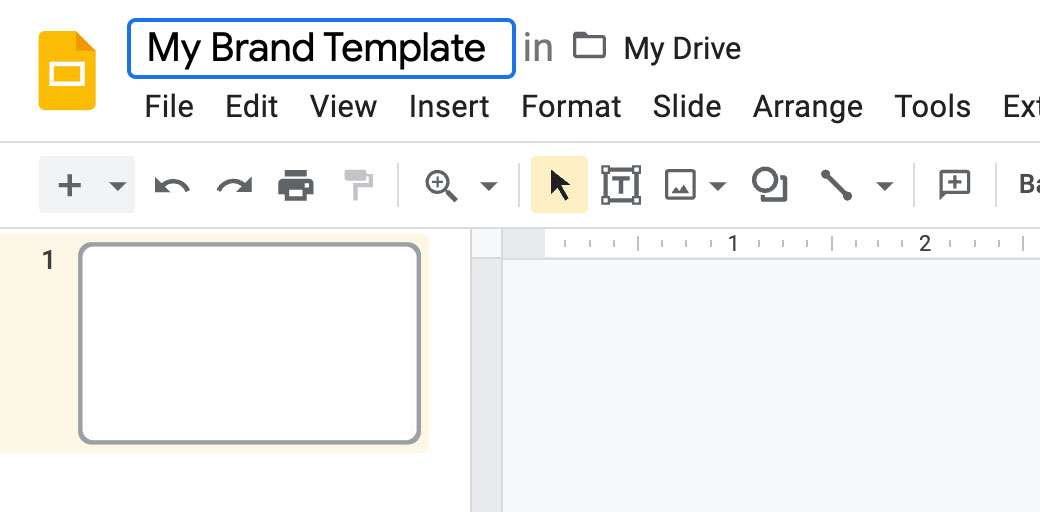
Final step: Name your slides document something that you will be able to find in the future. You will use this name when importing the theme into other slides documents.
And that’s how you ensure that you are using proper brand colors in your documents and presentations! Don’t want to hassle with all that yourself? We’re happy to make custom templates for letterhead, presentations, social media graphics and more using the programs that you use the most, including Microsoft Office, Google Suite, and online programs like Canva, Smore and Mailchimp.
