Designing Accessible Presentations from the Start
Presentations are a powerful way to share ideas, but like any other digital content, they need to be accessible to everyone. Many of the same principles from our Website Accessibility and Best Practices guide apply to slide decks. In addition to those points, there are some additional considerations to be aware of:
- Give every slide a unique, descriptive title
- Write meaningful, descriptive hyperlink text
- If you use tables, keep them simple—only for data—and specify column headers
- Use at least 18pt sans serif fonts, and maintain ample white space for readability
It’s a Fact!
It’s estimated that up to 4% of the U.S. population—about 12.5 million people—rely on assistive technology to access digital documents.
Tips for Success!
Use slide layouts
The most important part of PowerPoint accessibility is the use of slide “layouts.” Used correctly, these will ensure information on the slides have the correct heading structure and reading order.
Learn about slide layouts >
Slide reading order
To check or change the reading order, select Home > Arrange > Selection Pane. The Selection Pane will appear in the right-hand sidebar. Ensure that this order follows a logical order that someone would read the content.
Learn about slide reading order >
PowerPoint Presentations
Because PowerPoint is a paid application, it is not accessible by default. That means if you send someone a .pptx file, they’ll need to have PowerPoint installed to open it. That said, if your organization uses Office 365, you can share a web-based version of the presentation, similar to Google Slides. Another option is to save the PowerPoint as a PDF because Adobe Acrobat is free for anyone to download.
Whichever route you take, you’ll need to run accessibility checks to ensure your content works for all audiences. Fortunately, both the desktop and online versions of PowerPoint include built-in tools to help, but they’re not automatic, and you still need to know what to look for (sadly, no magic accessibility button…yet).
WebAIM does a great job looking at PowerPont from an accessibility perspective and covers the following topics:
- Templates and themes
- Slide layout and design
- Slide reading order
- Alternative text
- Tables
- Meaningful hyperlinked text
- Converting to other formats
- Checking accessibility
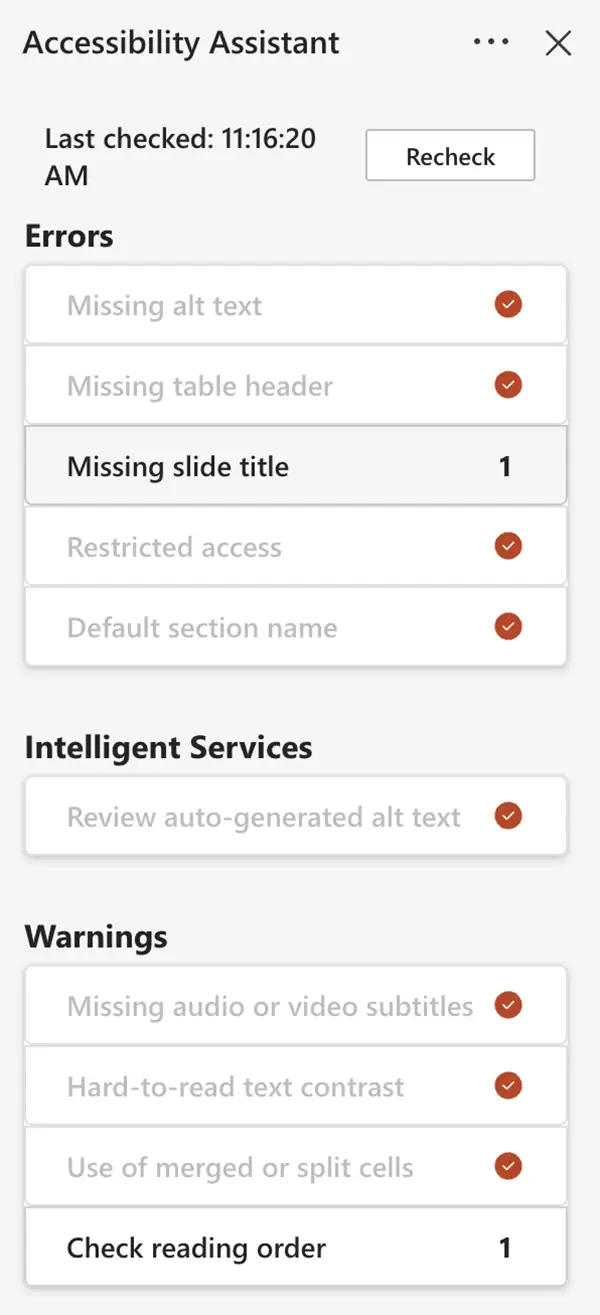
How to use the Accessibility Checker in PowerPoint
While there is a manual component, PowerPoint DOES have a built-in button to point you in the right direction! Here’s how to access the tool:
- Open PowerPoint: Launch the PowerPoint application and open your presentation.
- Go to the Review Tab: In the PowerPoint ribbon, click on the “Review” tab.
- Select Check Accessibility: On the “Review” tab, you’ll find the “Check Accessibility” option. Click on it.
- Review the Accessibility Checker Panel: The Accessibility Checker will open on the right side of the screen, displaying a list of potential accessibility issues.
- Fix the Identified Issues: The Accessibility Checker provides details for each issue, explaining why it’s a problem and how to fix it. Follow the recommendations to resolve the issues and make your presentation accessible.
- Double-check your work: Although the Accessibility Checker is a helpful tool, it might not catch all accessibility issues. It’s important to review your presentation visually and with a screen reader to ensure it’s truly accessible.

Google Slides
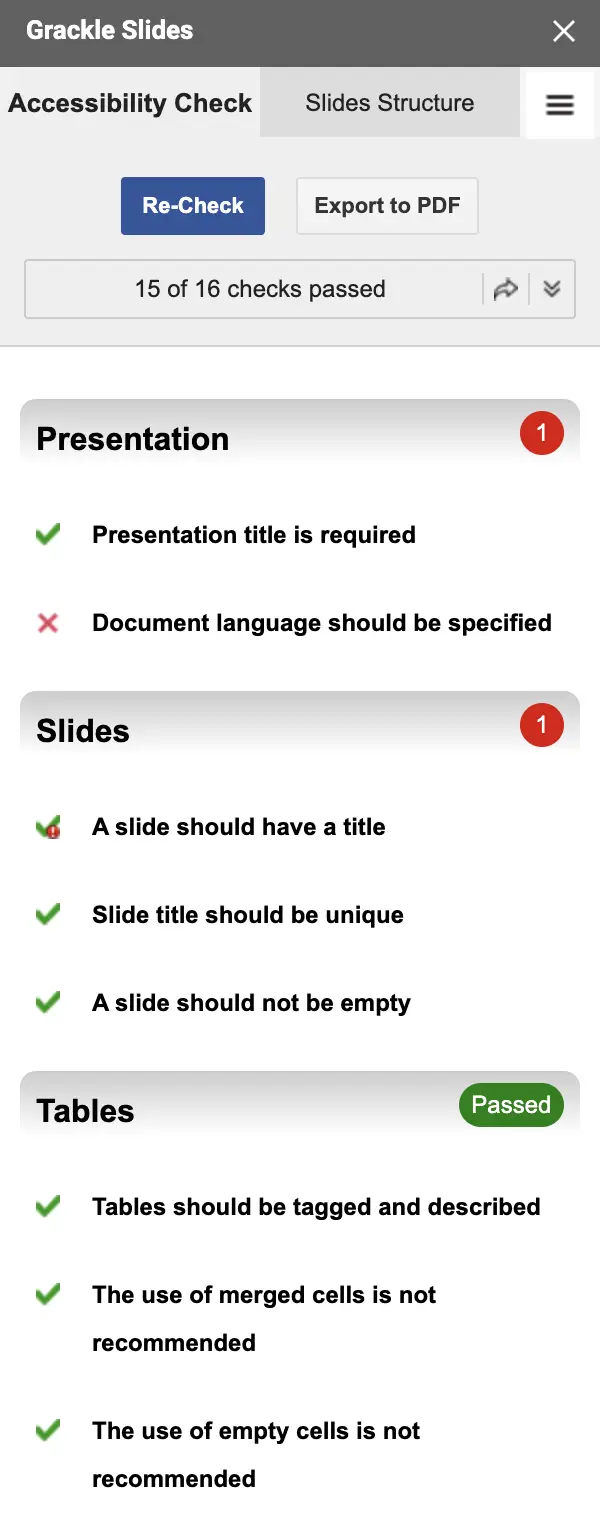
We refer to many of our districts that we work with as “Google Districts” since they utilize Google for Education versus Microsoft products. And why not? Google is probably the most accessible platform to create various types of documents in because anyone with the internet can access them for free! Google also has a nifty Chrome add-on called “Grackle Slides” that can easily be installed. After installing, Grackle is useful for checking accessibility issues and exporting as a PDF.
What on earth is a grackle?
According to the Google, a grackle is “a common name for a bird that is known for its ability to make a variety of calls and vocalizations.” Kind of fitting, right? The add-on is all about helping users make their documents more accessible, especially for folks using screen readers or other assistive tools.

Detailed steps to install and use Grackle
Install Grackle Slides:
- Open Google Slides.
- Go to Extensions > Add-ons > Get add-ons.
- Search for “Grackle Slides” and select it.
- Click Install.
- Follow the prompts to grant Grackle permission to access your Google account.
Launch Grackle and Run Accessibility Checks:
- Open the Google Slides presentation you want to check.
- Go to Extensions > Grackle Slides > Launch.
- Grackle will analyze your slides and display the results in a sidebar.
Review Accessibility Issues and Fix Problems:
- Grackle will categorize accessibility issues (e.g., images without alt text, low contrast, missing slide titles).
- Click on a category to see the specific slides with issues.
- Click on a slide number to navigate to that slide.
- Follow Grackle’s suggestions and fix the identified issues.
Iterate and Repeat:
- Run Grackle again to ensure you’ve addressed all the accessibility issues.
- Continue to review and fix any remaining problems until your slides are accessible.
Sharing the Presentation
Once you’ve run through these accessibility checks, you can either share a link to the slides (this is the better option) or download the file as a PDF. Pay close attention to how your PDF is generated with the following tips:
Download Google Slides as a PDF
Download online PowerPoint Slides as a PDF
Save a PowerPoint file from the desktop version as a PDF
Don’t Forget!
- When sharing Google Slides or PowerPoint Online slides, ensure the permissions are correct and that users aren’t required to login to view
- If you choose to download your presentation as a PDF, you need to run the accessibility checker in Acrobat Pro which is a paid version
Want to learn more about accessibility?
ESD 112 offers statewide training through PD Enroller.


